Vue生命周期详解

理解 Vue 的生命周期是尤为重要的,不仅是在于对 Vue 的理解,或者是实际项目中,对 Vue 的使用,都离不开 Vue 的生命周期。

Vue 生命周期

首先,先来看看Vue官网这张图( Vue 2.x 生命周期)
生命周期

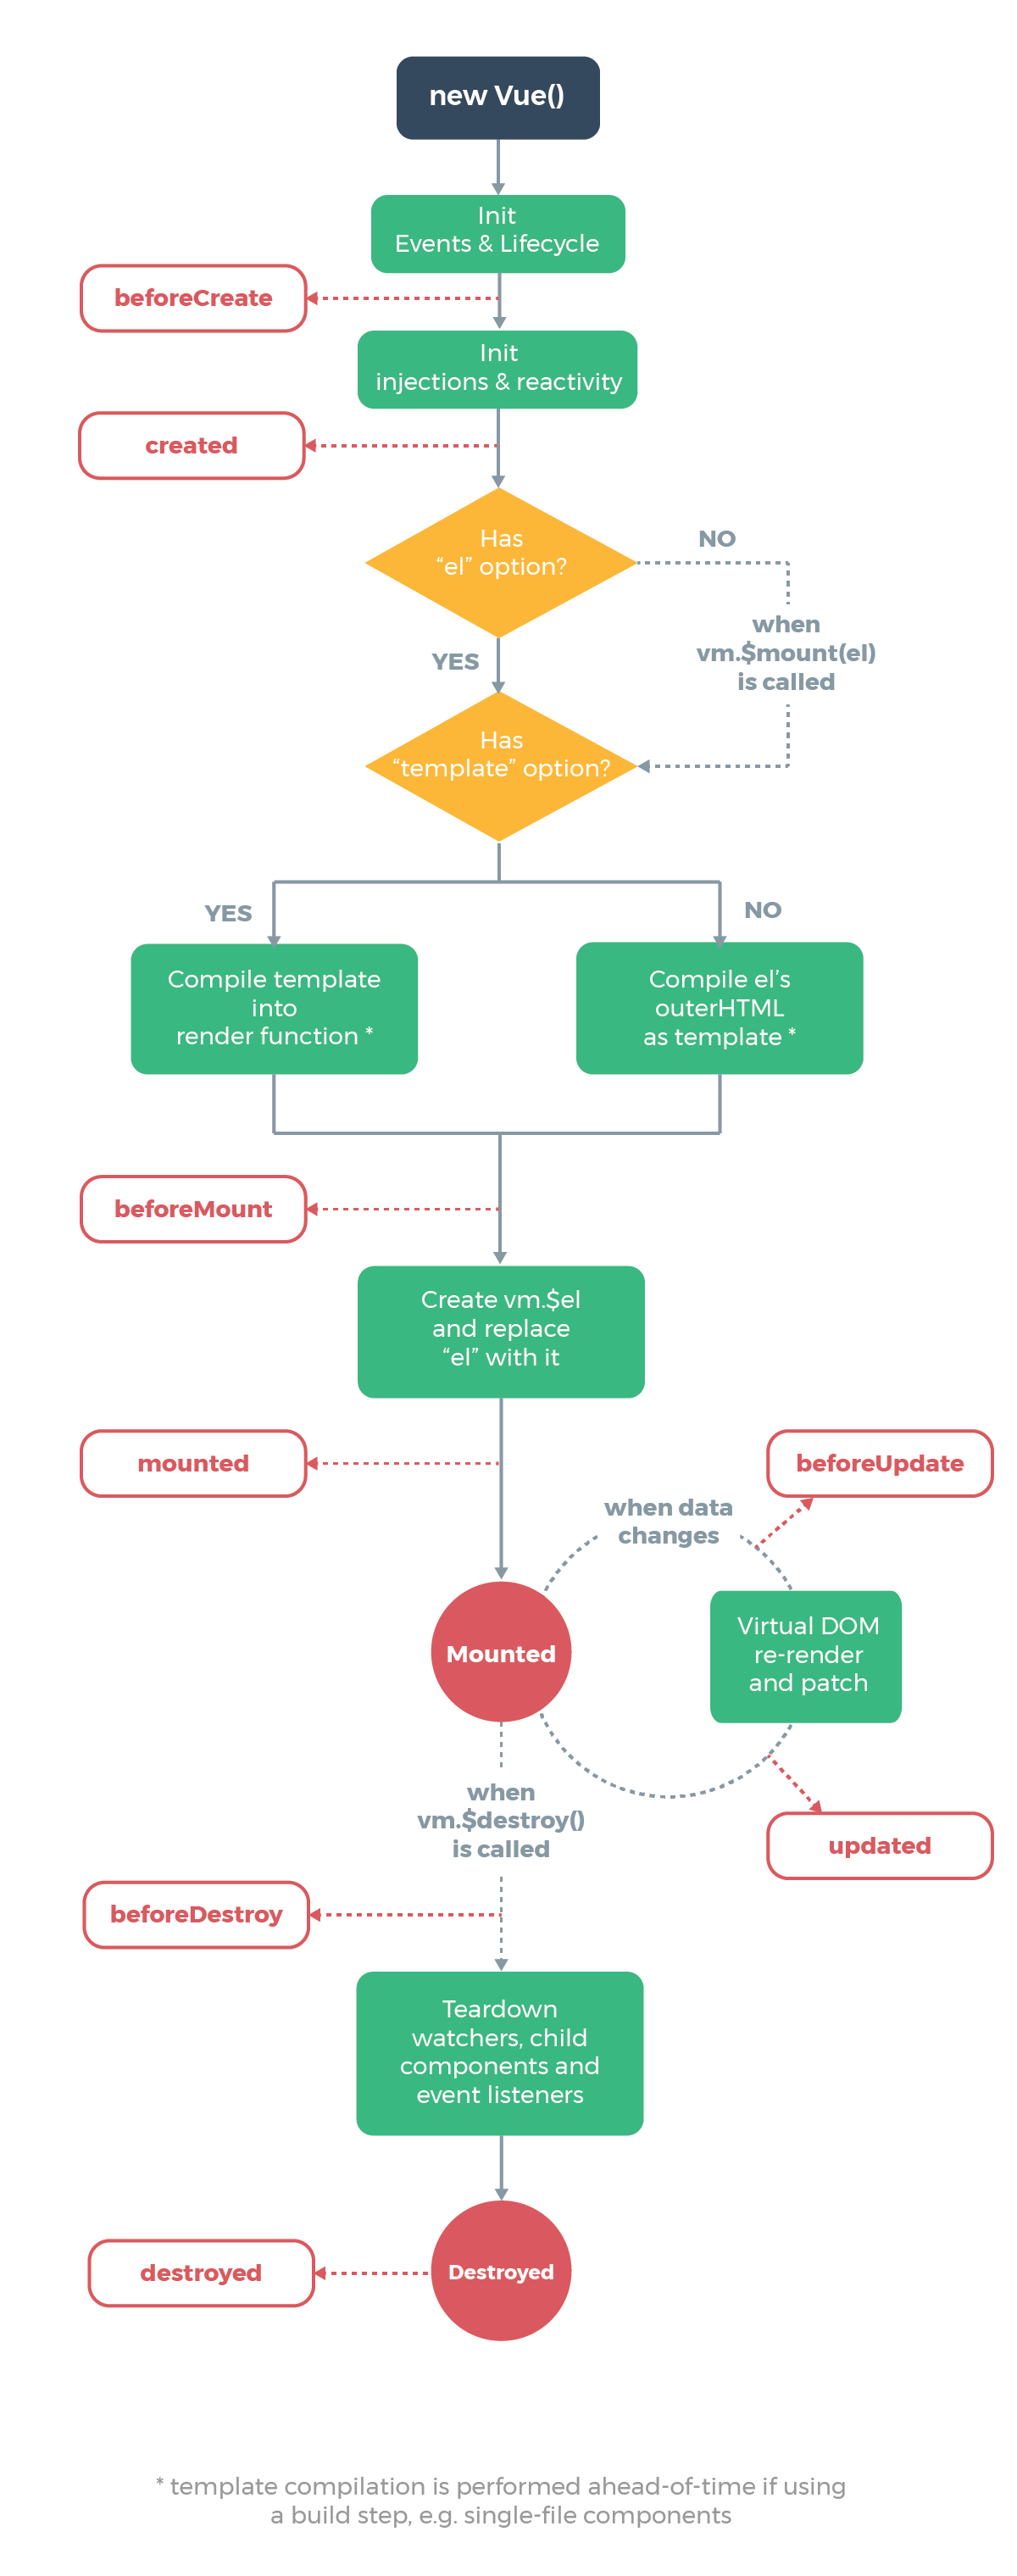
一切都是从创建 Vue 的实例开始的,实例创建完成后,进行数据响应、模板编译、指令绑定、数据渲染等操作。

主要有这些钩子函数:beforeCreate、created、beforeMount、mounted、beforeUpdate、updated、beforeDestory、destoryed

来看下简单的 demo,看下 Vue 生命周期的这些钩子函数到底做了哪些事

1
2
3
4
5
6
7
8
9
10
11
12
13
14
15
16
17
18
19
20
21
22
23
24
25
26
27
28
29
30
31
32
33
34
35
36
37
38
39
40
41
42
43
44
45
46
47
48
49
50
51
52
53
54
55
56
57
58
59
60
61
<!DOCTYPE html>
<html lang="en">
<head>
<meta charset="UTF-8">
<title>Vue 生命周期</title>
</head>
<body>
<div id="app">
{{message}}
</div>
<script src="https://cdn.jsdelivr.net/npm/vue@2.5.16/dist/vue.js"></script>
<script>
var app = new Vue({
el: '#app',
data: {
message: 'Hello Vue!'
},
beforeCreate () {
console.log('实例创建之前')
console.log(this.$el)
console.log(this.$data)
},
created () {
console.log('实例创建之后')
console.log(this.$el)
console.log(this.$data)
},
beforeMount () {
console.log('挂载到实例之前')
console.log(this.$el)
console.log(this.$data)
},
mounted () {
console.log('挂载到实例之后')
console.log(this.$el)
console.log(this.$data)
},
beforeUpdate () {
console.log('数据更新之前')
console.log(this.$el)
console.log(this.$data)
},
updated () {
console.log('数据更新之后')
console.log(this.$el)
console.log(this.$data)
},
beforeDestroy () {
console.log('实例销毁之前')
console.log(this.$el)
console.log(this.$data)
},
destroyed () {
console.log('实例销毁之后')
console.log(this.$el)
console.log(this.$data)
}
})
</script>
</body>
</html>

执行上述的 demo,输出如下:

1
2
3
4
5
6
7
8
9
10
11
12
13
14
15
16
17
18
19
实例创建之前
undefined
undefined
实例创建完成之后
undefined
{__ob__: Observer}
挂载到实例之前
<div id="app">
{{message}}
</div>
{__ob__: Observer}
挂载到实例之后
<div id="app">
Hello Vue!
</div>
{__ob__: Observer}

在浏览器控制台输入

1
app.message = 'Hello World!'

1
2
3
4
5
6
7
8
9
10
11
12
13
14
// 输出如下
数据更新之前
<div id=​"app">​
hello world
​</div>​
{__ob__: Observer}
数据更新之后
<div id=​"app">​
hello world
​</div>​
{__ob__: Observer}

在浏览器控制台输入

1
app.$destroy()

1
2
3
4
5
6
7
8
9
10
11
12
13
14
15
16
app.message = 'Hello World!'
// 输出如下
实例销毁之前
<div id=​"app">​
hello world
​</div>​
{__ob__: Observer}
实例销毁之后
<div id=​"app">​
hello world
​</div>​
{__ob__: Observer}

小结

通过上述代码,我们可以对 Vue 的生命周期有了大概的了解,

beforeCreate 在实例初始化之后,数据观测 (data observer) 和 event/watcher 事件配置之前被调用,此时 el 和 data 还未被赋值

created 在实例创建完成后被立即调用,会进行数据观测 (data observer),属性和方法的运算,watch/event 事件回调。

beforeMount 对 el 赋值,但数据还未装载

mounted 数据已装载,el 被新创建的 vm.$el 替换,并挂载到实例上去之后调用该钩子

beforeUpdate 发生在虚拟 DOM 打补丁之前

updated 当这个钩子被调用时,组件 DOM 已经更新,并不是所有子组件都会更新

beforeDestroy 实例被销毁之前调用,此时,实例仍可用

destroyed 实例被销毁之后调用,此时,实例不可用,但生成的 DOM 仍然存在,只是无法更改 DOM 中的数据

进一步深入

仅仅了解是不够,接下来我们通过源码来深入了解下 Vue 的生命周期

1
2
3
4
5
6
7
8
// vue/src/core/instance/index.js
// 当执行 new Vue() 时,会执行以下方法
initMixin(Vue)
stateMixin(Vue)
eventsMixin(Vue)
lifecycleMixin(Vue)
renderMixin(Vue)

initMixin

先来看看 initMixin(Vue) 方法

1
2
3
4
5
6
7
8
9
10
11
12
13
14
15
16
// vue/src/core/instance/init.js
export function initMixin (Vue: Class<Component>) {
// ...
initLifecycle(vm) // 初始化生命周期
initEvents(vm) // 初始化事件
initRender(vm) // 初始化渲染
callHook(vm, 'beforeCreate')
initInjections(vm) // resolve injections before data/props
initState(vm) // 初始化 Vue 实例中的data、watch、computed
initProvide(vm) // resolve provide after data/props
callHook(vm, 'created')
// ...
}
  • 在 调用 beforeCreate 之前,Vue 进行了生命周期、事件、渲染 render 的初始化
  • 在 beforeCreate 与 created 调用之间,进行了 injections 、state 、provide 的初始化

injections 和 provide,主要为高阶插件/组件库提供用例,成对出现,用于父级组件向下传递数据。这里不展开详述,重点看 initState() 方法。

1
2
3
4
5
6
7
8
9
10
11
12
13
14
15
16
17
// vue/src/core/instance/state.js
export function initState (vm: Component) {
vm._watchers = []
const opts = vm.$options
if (opts.props) initProps(vm, opts.props) // 初始化父组件传递的参数
if (opts.methods) initMethods(vm, opts.methods) // 初始化 Vue 实例中的方法
if (opts.data) {
initData(vm) // 初始化数据,并对 data 的各个属性进行遍历,然后通过 proxy 对 data 进行代理监听
} else {
observe(vm._data = {}, true /* asRootData */)
}
if (opts.computed) initComputed(vm, opts.computed) // 初始化 Vue 实例的计算属性
if (opts.watch && opts.watch !== nativeWatch) {
initWatch(vm, opts.watch) // 初始化 watch
}
}

initState() 主要是对 data/props/computed/watch 等进行初始化,主要调用了以下方法

initProps(),通过遍历 props 的值,验证传入的 props 类型是否正确,然后通过 defineReactive() (内部使用的是 object.defineProperty()) 将 props 转化为当前实例的响应式属性

initMethods(), 遍历 methods 属性,将 methods 绑定到 Vue 实例

initData(),遍历 data 属性,调用 proxy() (内部使用的是 object.defineProperty())对 data 进行数据劫持,然后调用 observe() 对 data 进行监听

initComputed(),建立一个新的watcher,遍历 computed ,通过 getter 对数据进行监听,如果 computed 中的属性,并不存在于 Vue 实例(data),那么会调用 defineComputed()(内部使用的是 object.defineProperty())将数据转换为响应式属性

initWatch(),遍历调用 createWatcher() 创建 watcher,createWatcher() 内部调用 vm.$watch() 方法进行注册监听事件。

mount

接下来是 mount 过程

1
2
3
4
5
6
7
8
// vue/src/core/instance/init.js
export function initMixin (Vue: Class<Component>) {
// ...
if (vm.$options.el) {
vm.$mount(vm.$options.el)
}
}

vm.$mount() 的作用是手动地挂载一个未挂载的实例

$mount 方法主要在两个地方:

  • vue/src/platforms/web/runtime/index.js
1
2
3
4
5
6
7
Vue.prototype.$mount = function (
el?: string | Element,
hydrating?: boolean
): Component {
el = el && inBrowser ? query(el) : undefined
return mountComponent(this, el, hydrating)
}

作用是通过 el 获取相应的DOM元素,然后调用 lifecycle.js 文件中的 mountComponent 方法

  • vue/src/platforms/web/entry-runtime-with-compiler.js
1
2
3
4
5
6
7
8
9
10
11
12
13
14
15
16
17
18
19
20
21
22
23
24
25
26
27
28
29
30
31
32
33
34
35
36
37
38
39
40
41
42
43
44
45
46
47
48
49
50
// 缓存了来自 web-runtime.js 的 $mount 方法
const mount = Vue.prototype.$mount
Vue.prototype.$mount = function (
el?: string | Element,
hydrating?: boolean
): Component {
el = el && query(el) // 获取相应的DOM元素
// 不允许将 el 挂载到 body 或 html
if (el === document.body || el === document.documentElement) {
// ...
return this
}
const options = this.$options
if (!options.render) { // 没有 render 选项,则解析 template 或 el 并转换为渲染函数render
let template = options.template
if (template) {
if (typeof template === 'string') {
if (template.charAt(0) === '#') {
template = idToTemplate(template)
// ...
}
} else if (template.nodeType) {
template = template.innerHTML
} else {
// ...
return this
}
} else if (el) {
// 没有 template,有 el,则根据 el ,获取 template
template = getOuterHTML(el)
}
if (template) {
// ...
// 根据 template,转换为 render
const { render, staticRenderFns } = compileToFunctions(template, {
shouldDecodeNewlines,
shouldDecodeNewlinesForHref,
delimiters: options.delimiters,
comments: options.comments
}, this)
options.render = render // 将转换的 render 方法挂载到 vm.$options
options.staticRenderFns = staticRenderFns
// ...
}
}
// 调用被缓存了来自 web-runtime.js 的 $mount 方法
return mount.call(this, el, hydrating)
}

作用主要就是根据 template 或者 el ,生成 render 函数,然后将 render 挂载到 vue 实例中,最后调用 lifecycle.js 文件中的 mountComponent 方法

那么 mountComponent 具体做了什么呢?

1
2
3
4
5
6
7
8
9
10
11
12
13
14
15
16
17
18
19
20
21
22
23
24
25
26
27
28
29
30
31
32
33
34
35
36
37
38
39
40
41
42
43
44
45
46
47
48
// vue/src/core/instance/lifecycle.js
export function mountComponent (
vm: Component,
el: ?Element,
hydrating?: boolean
): Component {
vm.$el = el // 在Vue实例对象上添加 $el 属性,指向挂载点元素
if (!vm.$options.render) {
// 如果没有 render 选项,则将 createEmptyVNode 赋值给 vm.$options.render
vm.$options.render = createEmptyVNode
// ...
}
// 调用 beforeMount 钩子函数
callHook(vm, 'beforeMount')
let updateComponent
/* istanbul ignore if */
if (process.env.NODE_ENV !== 'production' && config.performance && mark) {
// ...
} else {
// 更新组件
updateComponent = () => {
vm._update(vm._render(), hydrating)
}
}
// we set this to vm._watcher inside the watcher's constructor
// since the watcher's initial patch may call $forceUpdate (e.g. inside child
// component's mounted hook), which relies on vm._watcher being already defined
new Watcher(vm, updateComponent, noop, {
before () {
if (vm._isMounted) { // 是否已挂载
callHook(vm, 'beforeUpdate') // 调用 beforeUpdate 钩子函数
}
}
}, true /* isRenderWatcher */)
hydrating = false
// manually mounted instance, call mounted on self
// mounted is called for render-created child components in its inserted hook
// 如果是第一次 mount 则触发 mounted 生命周期钩子
if (vm.$vnode == null) {
vm._isMounted = true
callHook(vm, 'mounted') // 调用 mounted 钩子函数
}
return vm
}

Vue compile 过程

直接进入 Vue complier 的源码

1
2
3
4
5
6
7
8
9
10
11
12
13
14
15
16
17
// vue/src/complier/index.js
export const createCompiler = createCompilerCreator(function baseCompile (
template: string,
options: CompilerOptions
): CompiledResult {
const ast = parse(template.trim(), options) // 根据 template 字符串,生成 AST(抽象语法树)
if (options.optimize !== false) {
optimize(ast, options)
}
const code = generate(ast, options) // 将 AST 编译成可执行的代码字符串
return {
ast,
render: code.render,
staticRenderFns: code.staticRenderFns
}
})

这个函数就是导出一个可以创建 complier 的方法

parse

接下来看看 Vue 的 complier 是如何根据 template ,解析出 AST

1
const ast = parse(template.trim(), options)
1
2
3
4
5
6
7
8
9
10
11
12
13
14
// vue/src/complier/parser/index.js
export function parse (
template: string,
options: CompilerOptions
): ASTElement | void {
// ...
parseHTML(template, {
// ... 其他配置 options
})
// ...
}

主要就是调用了 parseHTML() 方法对 template 进行解析的,其内部主要是使用了一个 while 循环,对传入的 template 字符串进行遍历,根据 HTML 标签进行拆分,然后创建 AST

generate

根据生成的 AST,又是如何编译成可执行代码串的呢?

1
const code = generate(ast, options)
1
2
3
4
5
6
7
8
9
10
11
12
13
// vue/src/complier/codegen/index.js
export function generate (
ast: ASTElement | void,
options: CompilerOptions
): CodegenResult {
const state = new CodegenState(options)
const code = ast ? genElement(ast, state) : '_c("div")'
return {
render: `with(this){return ${code}}`,
staticRenderFns: state.staticRenderFns
}
}

AST 经过 generate得到 render 函数,render 的返回值是 VNode ,VNode 是 Vue 的虚拟 DOM 节点

编译完成之后,就进行构成 Virtual DOM,然后进行相关 diff 过程,最后更新实际的 DOM 节点

关于 Virtual DOM 和 Vue Diff 过程,请看另一篇博文 Vue 底层原理

参考 Vue 技术内幕

坚持原创技术分享,您的支持将鼓励我继续创作!